Showing posts with label ninja baker. Show all posts

Friday, June 24, 2011

Recipe Fridays!


Pizookies

This is genius. When my sister came to visit over Memorial Day weekend, we stopped to eat at this place on 2nd St called BJ's, and had one of their odd-named Pizookie's: basically a deep dish cookie with ice cream fabulousness. Then, I found this recipe that references the same thing, and I knew it was kismet;)

Ingredients
160 g (3/4 c) Light Brown Sugar
160 g (3/4 c + 1 T) Granulated Sugar
255 g (1 c) unsalted Butter
2 large Eggs
1 t Vanilla Extract
1 t Sea Salt
370 g (3 c) all-purpose, unbleached Flour
1 t Baking Soda
350 g (.75 lb) Dark Chocolate (cut into 1/2″ chunks or smaller)
4″ ramekins (or other small baking dish)

Vanilla Ice Cream

Preheat oven to 375° F (350° for convection ovens)


1. Beat together the butter, brown sugar and granulated sugar until light and fluffy. Add eggs, vanilla extract, and sea salt.


2. Sift together the flour and baking soda. Stir into batter, then add chocolate chunks and stir until well mixed.

3. Fill ramekins 1/2″ deep with raw cookie dough. Place ramekins on sheet pan and put in middle rack of oven. Bake 12-18 min., or until top starts to turn golden brown. (remember you want them slightly undercooked, but not too doughy.)

4. Remove from oven and place each ramekin on a napkin (this allows you to hold the hot dish as you eat your dessert delight.) Top with a couple scoops of ice cream. Grab a spoon and enjoy.


Friday, June 17, 2011

Recipe Fridays . . .


White Chocolate Fudge

My dad was not a cook. He never went near the oven, and most of his time by the refrigerator was spent peering inside, looking for things that were right in front of his face. He constantly threatened to make us his "famous Hawaiian pork chops", but in 19 years, he never made them once (for which I'm sorta glad). But I do remember the one thing he liked to make: white chocolate fudge. There was one notable incident when he kind of left the heat on too long when he was melting the white chocolate, or perhaps didn't stir it enough, and the fudge had rather a charcoal taste, but what the heck. I always tried it, because my dad had made it;)

Here's a recipe for him that sounds even better than his old white chocolate fudge (certainly without that burned after-taste!) I think you could add nuts or candy cane pieces pretty easily, and make it even better!

Ingredients:


•1 stick (4 oz) butter
•2 cups granulated sugar
•3/4 cup sour cream
•1 tsp salt
•1 package (12 oz) white chocolate chips
•1 jar (7 oz) marshmallow cream
•1 tsp vanilla extract

Preparation:

1. Prepare an 8x8 pan by lining it with aluminum foil and spraying the foil with nonstick cooking spray.

2. Place the butter, sour cream, salt, and sugar in a heavy-bottomed medium saucepan over medium-high heat. Stir until the sugar and butter melt.

3. Continue to cook the fudge, stirring frequently, until it comes to a boil. Once boiling, cook it for five minutes, stirring constantly to prevent scorching. If you are using a candy thermometer instead of timing it, it should be at 235 degrees.

4. After five minutes, remove the pan from the heat and add the white chocolate chips and the marshmallow cream. (For easier scooping of the marshmallow cream, try microwaving it for 15 seconds with the lid off.) Stir vigorously until the chips and cream are melted and incorporated. If necessary, return the fudge to the heat for brief periods to melt the chips.

5. Add the vanilla and stir well. Pour the fudge into the prepared pan and smooth it into an even layer. Allow it to set at room temperature for 3-4 hours, or in the refrigerator for 1-2 hours. To serve, cut it into small 1-inch pieces. Store White Chocolate Fudge in an airtight container at room temperature for up to one week or in the refrigerator for up to two weeks.

Friday, June 10, 2011

Recipe Fridays!

 Blue Cheese and Herb Quiche

Get this straight right now: this quiche will not work with your diet. It is full of rich, delicious goodness, but just forget about the calories and enjoy. Be bad! I won't tell! ;)

Ingredients


1 Savory Pie Crust
6 ounces cream cheese, at room temperature
2 ounces Maytag blue cheese, at room temperature
2 tablespoons unsalted butter, at room temperature
3 eggs
1 cup heavy cream
1 cup whole milk
1/2 teaspoon salt
1/4 teaspoon freshly ground black pepper
3 tablespoons chopped fresh mixed herbs, such as parsley, thyme, tarragon, chives, and/or oregano

Directions

1.Preheat the oven to 400 degrees.

2.On a lightly floured surface, roll out the pie crust dough to 1/8-inch thickness to fit an 8-inch
fluted tart pan. Fill the pan with the dough, easing the dough into the bottom and lightly pressing it against the sides. Trim off the excess dough.

3.Line the pastry shell with parchment paper, and fill it with ceramic pie weights or dried beans. Place the tart pan on a baking sheet, and bake for 9 minutes. Remove the baking sheet from the oven and set the tart pan on a wire rack to cool. Remove the parchment paper and the weights.

4.Reduce the oven temperature to 375 degrees.

5.In a medium bowl, whisk together the cream cheese, blue cheese, and butter. Whisk in the eggs until well blended. Stir in the cream, milk, salt, pepper, and herbs. Pour the filling into the partially baked pie shell. Return the tart pan to the baking sheet and bake, rotating the quiche halfway through, until it is puffed and golden brown, 25 minutes. The quiche is done when a knife inserted in the center comes out clean.

6.Remove the tart pan from the baking sheet and set it on a wire rack to cool for at least 5 minutes before slicing. Serve hot, warm, or at room temperature.

Friday, May 20, 2011

Recipe Fridays!


Strawberry Tart

This tart is seriously delicious, and not all that tough to make. With temps warming up, I always start thinking of strawberries;)

Ingredients


For the Crust

1 1/4 cups all-purpose flour (spooned and leveled), plus more for handling dough
1/2 cup (1 stick) cold unsalted butter, cut into small pieces
1/3 cup sugar
1/4 teaspoon salt

For the Filling

1 bar (8 ounces) reduced-fat cream cheese, softened
1/4 cup sugar
1 1/2 to 2 pounds strawberries, hulled and halved
1/4 cup seedless red currant jelly

Directions

1.Make the crust: Preheat oven to 350 degrees. In a food processor, blend flour, butter, 1/3 cup sugar, and salt until moist crumbs form (this may take up to 1 minute). Transfer dough to a 9-inch round tart pan with a removable bottom.
2.With floured fingers, press dough evenly into pan and up sides. Dip a dry-measuring cup in flour, and use it to press dough firmly into bottom and against sides of pan. Freeze crust until firm, 10 to 15 minutes.
3.Using a fork, prick crust all over. Bake until golden, 25 to 30 minutes, pressing down gently once or twice with a spoon during baking if crust puffs up. Cool completely in pan.
4.Make the filling: In a medium bowl, mix cream cheese and remaining 1/4 cup sugar until smooth; spread mixture evenly in bottom of baked crust (still in tart pan).
5.Starting from outside edge, arrange strawberry halves, stemmed side down, in tight concentric circles on cream cheese.
6.In a small saucepan, heat jelly on medium-low until liquefied. Gently brush strawberries with jelly; let set at least 20 minutes. Chill in pan at least 1 hour (and up to 6 hours); remove from pan just before serving.

Friday, May 13, 2011

Recipe Fridays!


Blueberry Buttermilk Scones

Mmmmm . . . I'm considering making these this weekend, with my organic dried blueberries . . .

Ingredients


1 1/2 cups all-purpose flour
1/2 cup cake flour, (not self-rising)
3 tablespoons granulated sugar
2 1/2 teaspoons baking powder
3/4 teaspoon salt
4 ounces (1 stick) cold unsalted butter, cut into small pieces
1 cup (1/2 pint) blueberries
1/2 cup low-fat buttermilk
1 large egg, plus 1 large egg lightly beaten for egg wash
1/2 teaspoon pure vanilla extract
Fine sanding sugar, for sprinkling

Directions

1.Preheat oven to 375 degrees. Line a baking sheet with parchment paper.
2.Whisk together flours, granulated sugar, baking powder, and salt in a large bowl. Cut in butter with a pastry cutter, or rub in with your fingers, until mixture has the texture of coarse meal. Stir in blueberries.
3.Whisk together buttermilk, 1 egg, and the vanilla. Drizzle over flour mixture, and stir lightly with a fork until dough comes together but a small amount of flour remains in bowl.
4.Turn out dough onto a work surface, and gently knead dough once or twice just to incorporate flour. Pat dough into a 1-inch-thick round. Cut into 12 wedges. Transfer to prepared baking sheet. Brush with egg wash, and sprinkle with sanding sugar. Bake until golden brown and cooked through, about 22 minutes. Transfer scones to wire racks to cool. Scones are best served immediately but can be frozen for up to 1 month. Thaw, and reheat in a 350-degree oven for 10 minutes.

Friday, May 6, 2011

Recipe Fridays!

Peanut Butter and Jam Heart Cookies

This week's recipe is Mom-themed:) Peanut butter and jelly sanwiches always remind me of mom, so here's a twist on that with yummy-yummy cookies!

Ingredients


1 1/2 cups all-purpose flour
1 1/2 teaspoons baking powder
1/4 teaspoon salt
1 stick unsalted butter, room temperature
1/2 cup granulated sugar
1/2 cup packed light-brown sugar
1 cup creamy peanut butter
1 large egg
1/3 cup raspberry jam, stirred to loosen

Directions

1.Whisk together flour, baking powder, and 1/4 teaspoon salt. Beat butter and sugars with a mixer on medium speed until pale and fluffy. Beat in peanut butter, then egg. Reduce speed to low, and beat in flour mixture until dough forms. If dough is sticky, refrigerate for 5 to 10 minutes.

2.Preheat oven to 350 degrees. Roll dough into 1 1/2-inch balls (about 2 tablespoons each). Arrange on parchment-lined baking sheets, spacing 1 1/2 inches apart. Press into 1 3/4-inch rounds. Press hearts into centers using your fingertips. Refrigerate for 20 minutes.

3.Bake for 12 minutes. Remove from oven, and reshape hearts using your fingertips or the handle of a wooden spoon. Fill indentation of each with a generous 1/2 teaspoon jam to form a heart. Bake until cookies are firm, 6 to 7 minutes more.

Friday, April 29, 2011

Recipe Fridays!


Red Velvet Cake

from Martha Stewart

I know I posted this recipe already, but I just made this for a coworker's birthday, and it was delicious!

Ingredients
Makes 5 cups batter

Unsalted butter, softened, for pans
2 tablespoons unsweetened cocoa powder, plus more for dusting
2 1/2 cups cake flour, not self-rising
1 teaspoon salt
1 1/2 cups sugar
1 1/2 cups canola oil
2 large eggs
2 tablespoons red food coloring
1 teaspoon pure vanilla extract
1 cup low-fat buttermilk
1 1/2 teaspoons baking soda
2 teaspoons white vinegar

Directions


1.Preheat oven to 350 degrees. Butter pans; line with parchment paper. Butter lining; dust with cocoa, tapping out excess. Set aside. Whisk together flour, salt, and cocoa in a medium bowl; set aside.

2.Mix sugar and oil on medium speed in the bowl of an electric mixer fitted with the whisk until combined. Add eggs one at a time; mix well after each addition. Mix in food coloring and vanilla. Add flour mixture in 3 batches, alternating with the buttermilk and beginning and ending with flour, mixing well after each addition. Scrape down sides of bowl as needed.

3.Stir together baking soda and vinegar in a small bowl. Add baking-soda mixture to batter, and mix on medium speed 10 seconds. Pour batter into prepared pans. Bake until a cake tester inserted into centers comes out clean, 30 to 35 minutes. Let cool completely in pans on wire racks.

Friday, April 22, 2011

Recipe Fridays!

Homemade Cadbury Creme Eggs

If you lived in my house growing up, Cadbury Eggs were a must at Easter time. We each got one in our basket, and you saved it until the very end, savoring it, leaving the best for last. When I found this recipe, I nearly squeed; I can't wait to try it;) These are pretty advanced, so keep that in mind before tackling this at home!


Ingredients

½ cup Lyle’s Golden Syrup
¾ stick (6 tablespoons) butter, softened
½ teaspoon salt
3 drops orange blossom water (optional)
1 vanilla bean, seeds removed (optional)
1 teaspoon vanilla
3 cup powdered sugar
¼- ½ teaspoon yellow food color
12 oz dark chocolate, chopped (or 1 bag Ghirardelli 60% chips)

Place the butter in the bowl of a stand mixer that has been fitted with the paddle attachment (this can easily be done by hand or with a hand mixer). Add the Golden Syrup, salt, orange blossom water (if using), vanilla seeds and vanilla. Mix on medium-low to combine. Scrape down the sides of the bowl with a rubber spatula to make sure everything is mixed well.

Turn the mixer to low and slowly add the powdered sugar. Mix until completely smooth, scraping down the sides of the bowl as necessary.

Place ⅓ of the mixture into a small bowl and add enough food color to obtain desired color.

Cover both bowls with plastic wrap and put into the freezer for at least 15 minutes. It is necessary that this mixture be very cold while working with it.


When the sugar mixture has completely chilled remove from the freezer. Working quickly take about ½ teaspoon of the “yolk” mixture and roll it into a ball. Continue forming your yolks.

Once the yolks are complete place them on a plate or a sheet tray covered with parchment and then put that back into the freezer.

Now working with your “whites” use a tablespoon measure to scoop out the sugar mixture then roll that into a ball. Continue until all the white portion of the sugar mixture is gone.

If the “whites” are too soft place back into the freezer for a few minutes.

Remove the “yolks” from the freezer. Place a “white” in the palm of your hand and gently flatten a bit. Create a indent in the center to rest the “yolk” in. Place the “yolk” in the center of the “white” then cover it up. Roll the “white” into an egg shape. If at any point the sugar mixture gets too soft quickly put it back into the freezer.


Continue this process until all your eggs are complete. Return to the freezer.

While your eggs are chilling temper your chocolate (David Lebovitz has a great post on tempering chocolate).

Or melt the chocolate in a microwave at 30 second intervals stirring very well in between. Add 1 tablespoon canola oil to the chocolate and stir well. This gives you a little more flexibility with the chocolate eliminating some of the need for precise tempering. You will not, however get as nice of a crack as you bite into the egg.

Working with one egg at a time, remove the egg from the freezer and stick a toothpick in it. Dip the egg into the chocolate and carefully let the excess chocolate drip off. Place the toothpick into something – like a yam perhaps – while the chocolate sets.


Place the chocolate covered egg into the fridge for 10 minutes while the chocolate sets.

Carefully remove the toothpick from the egg and cover up the small hole with a little bit of tempered chocolate.

Friday, April 15, 2011

Recipe Fridays!

Matzo S'mores

Yes, folks, you're looking at a blog from the future! Blogger decided to post this now, in spite of my instructions. Whatever.
Passover starts Monday at sundown, and this is the first year I won't be able to make it to my best friends' seder. I'll just have to make some of these, and think of them;)

Ingredients


Matzo
Chocolate
Marshmallows, toasted under broiler

Directions

1.Break matzo into small squares.
2.Drizzle melted chocolate on top, and refrigerate until set, about 5 minutes.
3.Layer matzo squares with pieces of chocolate, marshmallows (toasted under broiler), and more matzo squares.


Friday, April 8, 2011

Recipe Fridays!


Strawberry Parfaits

Spring and summer always make me want things with strawberries in them, and for me strawberries jave an added attraction: we thought I was alergic to them when I was young, so I didn't really get to eat them until I was a teenager. It was like falling in love;) Enjoy!
Ingredients


1  store-bought pound cake
2 large eggs
1 large egg yolk
1/2 cup sugar plus 3 tablespoons sugar
Coarse salt
2 pints strawberries, hulled and halved, plus 4 whole strawberries, thinly slices crosswise, for garnish
1 teaspoon freshly squeezed lemon juice
1/4 cup heavy cream
Confectioners' sugar, for dusting

Directions

1.Slice pound cake crosswise into four 1/4-inch-thick slices, reserving any remaining pound cake for another use. Insert a 3-inch heart-shaped mold into each slice and remove any of the cake that remains around the outer edge of the cutter. Transfer cutters, with cake in the bottom to a parchment paper-lined baking sheet; set aside.

2.Fill a medium saucepan with about 2 inches of water and bring to a boil; reduce to a simmer. In the heatproof bowl of an electric mixer, combine the eggs, yolk, 3 tablespoons sugar, and a pinch of salt. Set bowl over, but not touching, simmering water and whisk until egg mixture reaches 140 degrees on an instant-read thermometer. Transfer bowl to an electric mixer fitted with the whisk attachment, and whisk until mixture is thickened and forms ribbons.

3.Meanwhile, in the bowl of a food processor, combine 2 pints strawberries, remaining 1/2 cup sugar, lemon juice, and a pinch of salt. Pulse until finely chopped; set aside.


4.In the bowl of an electric mixer fitted with the whisk attachment, beat heavy cream until soft peaks form. Fold whipped cream into yolk mixture, along with 1/4 of the strawberry mixture, until well combined. Top the cake-filled molds with the yolk mixture, smoothing out the top so that it is even with the molds. Transfer to a freezer and freeze overnight. Refrigerate remaining strawberry mixture overnight.


5.Remove parfaits from freezer. Push strawberry parfaits from molds to remove, using a hot towel, if necessary. Let parfaits stand for 20 minutes.


6.Cover the bottom of each of four dessert plates with remaining strawberry mixture; top with parfait. Dust with confectioners' sugar and fan strawberry slices on top of parfaits; serve immediately.


Friday, April 1, 2011

Recipe Fridays!


Easter Egg Cakes

These are darn cute, and definitely a different way to think about eggs on Easter. When I was a kid I hated hard-boiled eggs, and always used to give mine away as fast as I could. I learned to like them over the years, but if I'd had these . . . well, I probably wouldn't have tried to like the real kind!

Ingredients

8 tablespoons (1 stick) unsalted butter, room temperature, plus more for pans
3/4 cup all-purpose flour, plus more for pan
1/2 cup plus 2 tablespoons granulated sugar
1 teaspoon pure vanilla extract
Grated zest of 1/2 lemon
3 large eggs, room temperature
3/4 teaspoon baking powder
1/4 teaspoon salt

Colored Butter Glaze for Easter Egg Cakes

3 tablespoons confectioners' sugar
7 cups assorted fresh fruit, like strawberries, blueberries, blackberries, raspberries, peaches, apricots, and cherries, cut into bite-size pieces
3 tablespoons Grand Marnier
24 fresh mint leaves, for garnish

Directions

1.Heat oven to 250 degrees, with a rack in the center. Generously butter the wells of an egg-cake pan, and dust the wells with flour; tap out any excess. Set pan aside.

2.In the bowl of an electric mixer fitted with the whisk attachment, combine butter and granulated sugar. Beat on medium speed until light and fluffy, about 2 minutes. Add vanilla and lemon zest; beat to combine. Add the eggs, one at a time, mixing well after each addition and scraping down sides of bowl.

3.Sift together the flour, baking powder, and salt. Add to butter mixture. Beat until just combined. Spoon batter into each of 6 wells in the cake pan, filling to within 1/2 inch of the rim. (If you are using an egg-cake pan with more than 6 wells, alternate between the filled and empty ones.)

4.Bake the egg cakes for 10 minutes. Increase the oven temperature to 350 degrees, and bake until the cakes are golden, 10 to 12 minutes more. Transfer egg-cake pan to a wire rack, and let cool slightly. While the cakes are baking make the first batch of glaze.

5.Invert pan, and remove cakes. Using a serrated knife, trim the cakes to resemble eggs sliced in half. (To make trimming easier, place the eggs in resealable plastic bags, and transfer to freezer for 45 minutes.) Using a melon baller, scoop out a 1-inch-diameter hole in each cake. Set a wire rack over a baking sheet. Place the cakes flat-side down on the wire rack. Working quickly, pour the colored butter glaze over 3 cakes, completely coating the outside of the cake. Make second batch of glaze, and glaze remaining 3 cakes. Let glaze set completely, about 1 hour.

6.Turn the glazed cakes over, and trim away any excess glaze with a paring knife so glaze is flush with the flat side of cake. Wash and dry wire rack.

7.Place cakes glazed-side down on the clean wire rack; generously dust flat side with confectioners' sugar. Fit a pastry bag with a coupler, and fill the bag with lemon curd. (Alternately, the curd can be carefully spooned into the hole.) Fill each hole with lemon curd until it resembles a slightly rounded egg yolk.

8.In a large bowl, combine fruit and Grand Marnier, and toss to coat. On each dessert plate, make a nest of fruit, and place a decorated cake in the center. Garnish with mint leaves, and serve.

Friday, March 25, 2011

Recipe Fridays!


Red Velvet Cake

I got a request for this here at work, so I guess I'm going to have to try my hand at this one;)

Ingredients
Makes 5 cups batter

Unsalted butter, softened, for pans
2 tablespoons unsweetened cocoa powder, plus more for dusting
2 1/2 cups cake flour, not self-rising
1 teaspoon salt
1 1/2 cups sugar
1 1/2 cups canola oil
2 large eggs
2 tablespoons red food coloring
1 teaspoon pure vanilla extract
1 cup low-fat buttermilk
1 1/2 teaspoons baking soda
2 teaspoons white vinegar


Directions

1.Preheat oven to 350 degrees. Butter pans; line with parchment paper. Butter lining; dust with cocoa, tapping out excess. Set aside. Whisk together flour, salt, and cocoa in a medium bowl; set aside.

2.Mix sugar and oil on medium speed in the bowl of an electric mixer fitted with the whisk until combined. Add eggs one at a time; mix well after each addition. Mix in food coloring and vanilla. Add flour mixture in 3 batches, alternating with the buttermilk and beginning and ending with flour, mixing well after each addition. Scrape down sides of bowl as needed.

3.Stir together baking soda and vinegar in a small bowl. Add baking-soda mixture to batter, and mix on medium speed 10 seconds. Pour batter into prepared pans. Bake until a cake tester inserted into centers comes out clean, 30 to 35 minutes. Let cool completely in pans on wire racks.

Friday, March 11, 2011

Recipe Fridays!

Spring Shower Almond Petit Fours

These are ADORABLE! And, they give me the perfect excuse to practice my gum-paste flowers too;)


Ingredients

6 tablespoons unsalted butter, softened, plus more for baking sheet
1 1/4 cups cake flour (not self-rising), plus more for baking sheet
3/4 teaspoon baking powder
1/4 teaspoon baking soda
1/4 teaspoon salt
1 cup sugar
1/2 cup almond paste
4 large eggs, separated
1/2 teaspoon pure vanilla extract
1/2 cup whole milk
1/2 cup cherry preserves, processed in a food processor
Sugar Glaze
Gum paste cherry blossoms, (available at Wendy Kromer Confections)

Directions

1.Preheat oven to 350 degrees. Butter a 12-by-17- inch rimmed baking sheet, and line with parchment paper. Butter parchment, and dust with flour, tapping out excess; set aside. Sift flour, baking powder, baking soda, and salt into a large bowl; set aside.

2.Put 3/4 cup sugar and the almond paste into the bowl of an electric mixer fitted with the paddle attachment. Mix on medium-low speed until mixture resembles coarse meal, about 2 minutes. Raise speed to medium-high. Add butter; mix until pale and fluffy, about 2 minutes. Mix in egg yolks and vanilla. Add flour mixture in 2 batches, alternating with the milk. Transfer to a large bowl; set aside.

3.Put egg whites into the clean bowl of an electric mixer fitted with whisk attachment; beat on medium-high speed until foamy. Gradually add remaining 1/4 cup sugar, beating until soft peaks form. Fold one-third of egg-white mixture into batter with a rubber spatula. Gently fold in remaining egg-white mixture.

4.Spread evenly into prepared sheet. Bake until a cake tester inserted into center comes out clean, 15 to 20 minutes. Transfer sheet to wire rack; let cool completely. Unmold; remove parchment.

5.Cut cake in half crosswise. Spread one half with preserves; top with remaining half. Refrigerate 1 hour. Trim cake, and cut into 11/2-inch squares. Transfer to a wire rack set over a rimmed baking sheet. Pour glaze over each petit four, spreading over top and sides to coat completely. Reuse glaze, straining to remove any solids, if needed. Refrigerate until set, about 20 minutes. Garnish with blossoms. Cakes can be refrigerated up to 2 days.


Friday, February 25, 2011

Recipe Fridays!


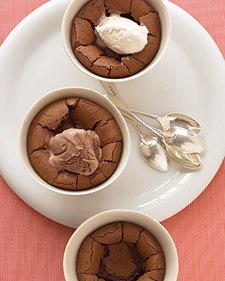
Warm Chocolate Puddings
from Martha Stewart

It's a little chilly even here in SoCal, and today is grey and rainy. days like this always make me think of warm desserts, and these puddings are the perfect mix of decadent and cozy. I usually skip the ice cream (not a big fan) but the rest is delicious!

Ingredients

Serves 4
  • 4 ounces semisweet or bittersweet chocolate, chopped
  • 4 tablespoons (1/2 stick) unsalted butter
  • 4 tablespoons sugar
  • 2 large eggs, yolks and whites separated
  • 1/2 teaspoon pure vanilla extract
  • 1/4 teaspoon salt
  • Ice cream (any flavor), for serving (optional)

Directions

  1. Preheat oven to 375 degrees. Place four 6- to 8-ounce ovenproof bowls on a baking sheet. Set aside.
  2. Place chocolate and butter in a medium heatproof bowl set over (not in) a saucepan of gently simmering water. Stir occasionally just until melted, 4 to 5 minutes. Remove from heat; mix in 2 tablespoons sugar, then egg yolks and vanilla. Set aside.
  3. In a medium bowl, with an electric mixer, beat egg whites and salt until soft peaks form. Still beating, gradually add remaining 2 tablespoons sugar; beat until mixture is stiff and glossy.
  4. Using a rubber spatula, mix about 1/3 egg-white mixture into chocolate mixture; gently fold in remaining egg-white mixture just until combined. Divide among bowls. (Puddings can be prepared in advance up to this point; cover with plastic wrap, and refrigerate up to 1 day.)
  5. Bake until tops are puffed and cracked but insides are still quite soft (a toothpick inserted in center will come out gooey), 20 to 25 minutes, or 25 to 30 minutes if puddings were previously refrigerated. Serve, warm or at room temperature (puddings may sink as they cool), topped with ice cream, if desired.

Friday, February 4, 2011

Recipe Fridays!


Strawberries and Cream Cheesecake
from Martha Stewart

Yes, I'm continuing the trend of pink desserts for Valentine's Day, darn it. You really can't go wrong with this incredibly yummy dessert. The oven-roasted strawberries are more tart than you would expect, making a cheesecake that in pink--but not too sweet!

Ingredients

Serves 8 to 10
  • 1 1/2 pounds strawberries, hulled
  • 3 tablespoons light corn syrup
  • 1 1/2 cups finely ground graham crackers (about 4 sheets)
  • 1 cup plus 3 tablespoons sugar
  • 3 tablespoons unsalted butter, melted
  • 1 pound plus 13 ounces cream cheese, room temperature
  • 1/4 teaspoon salt
  • 2 large eggs, room temperature
  • 1 vanilla bean, seeds scraped and reserved
  • 8 3/4 ounces mascarpone cheese, room temperature

Directions

  1. Preheat oven to 300 degrees. Place strawberries in a single layer on a rimmed baking sheet. Drizzle with corn syrup, and toss gently to coat. Bake until syrup thickens and strawberries turn deep red and shrink slightly, about 1 hour 30 minutes. Transfer strawberries and syrup to a medium bowl, and mash with a potato masher. Let cool completely.
  2. Raise oven temperature to 350 degrees. Stir together graham cracker crumbs, 3 tablespoons sugar, and the melted butter in a small bowl. Press mixture into the bottom of a 9-inch springform pan to make an even layer. Bake until crust is firm to the touch and has just darkened, about 10 minutes. Transfer pan to a wire rack, and let crust cool completely.
  3. Reduce oven temperature to 325 degrees. Put cream cheese into the bowl of an electric mixer fitted with the paddle attachment; mix on medium-low speed until creamy, about 2 minutes. Scrape down sides of bowl, then gradually add remaining cup sugar and the salt. Scrape down sides of bowl; add eggs, 1 at a time, mixing well after each addition. Scrape down sides of bowl, and mix in vanilla bean seeds and mascarpone until very creamy and no lumps remain, about 3 minutes. (Reserve vanilla bean for another use.)
  4. Transfer 5 cups cream cheese mixture to bowl with mashed strawberries; stir to combine. Pour strawberry-cream cheese mixture on top of crust; smooth with an offset spatula. Carefully spoon dollops of plain cream cheese mixture on top, smoothing with an offset spatula.
  5. Wrap the exterior of the springform pan in 2 layers of foil; set in a large roasting pan. Fill roasting pan with boiling water until water reaches halfway up the sides of the springform pan. Bake cheesecake until set, about 1 hour to 1 hour 10 minutes. Remove springform pan from water bath, and transfer to a wire rack to cool. Refrigerate until cold, at least 4 hours (up to overnight).

Friday, January 28, 2011

Recipe Fridays!

Valentine Cookies
from Martha Stewart

I'm jumping on the bandwagon. Usually I'm not much of a Valentine's Day person; the hearts and flowers make me want to kick a puppy (not really, just metaphorically!)But, one thing I can get behind are themed baked goods;) Martha knows her sugar cookies; these are a little like the linzer cookies of hers that I love so much, but without the nuts in the batter. Enjoy!

Ingredients

Makes several dozen, depending on cookie size
  • 1 cup (2 sticks) unsalted butter
  • 2 cups sugar
  • 2 large eggs
  • 4 2/3 cups all-purpose flour, plus more for dusting
  • 1 teaspoon baking soda
  • 1/4 teaspoon salt
  • 1/4 cup buttermilk
  • 1/2 cup pale-pink or white sanding sugar (optional)
  • Petal dust in pink, orange, and violet tones (optional)
  • 2/3 cup apricot or strawberry jam, slightly warmed (optional)

Directions

  1. In bowl of electric mixer fitted with the paddle attachment, cream butter and sugar until fluffy, about 4 minutes. Add eggs, one at a time, beating well after each. Sift flour, baking soda, and salt into large bowl. On low speed, gradually add flour mixture to mixer bowl, alternating with buttermilk, until combined. Wrap dough in plastic; chill until firm, 1 hour or overnight.
  2. To color white sanding sugar, if using: Place a few tablespoons in a small bowl. Mix in petal dust with a toothpick, a bit at a time, until desired shade is reached. Colored sanding sugar will last indefinitely.
  3. Heat oven with two racks centered to 350 degrees. Line 2 baking sheets with parchment paper. On lightly floured surface, roll chilled dough 1/8 inch thick. Cut out hearts using any 1- to 3 1/2-inch heart cookie cutters. If desired, cut centers out of some hearts. Transfer with spatula to baking sheets. Chill for 30 minutes. Sprinkle with sanding sugar, if using. Bake until just golden but not too brown, about 10 minutes. Transfer cookies to rack. Continue with dough; reroll scraps.
  4. To make sandwich hearts: Brush bottom heart lightly with jam; cover with a second heart with center cut out; jam will adhere hearts. Fill cut-out area with more jam. Cookies will keep, in an airtight container, at room temperature for 1 week.

Friday, January 21, 2011

Recipe Fridays!


Devil's Food Cupcakes
from Martha Stewart

Having just made a fantastic devil's food wedding cake, these sound scrumptious. And, how cute are those little chocolate curls on top?

Ingredients

  • 3/4 cup unsweetened Dutch-process cocoa powder
  • 3/4 cup hot water
  • 3 cups all-purpose flour
  • 1 teaspoon baking soda
  • 1 teaspoon baking powder
  • 1 1/4 teaspoons coarse salt
  • 1 1/2 cups (3 sticks) unsalted butter
  • 2 1/4 cups sugar
  • 4 large eggs, room temperature
  • 1 tablespoon plus 1 teaspoon pure vanilla extract
  • 1 cup sour cream, room temperature
  • Chocolate Ganache Frosting
  • Chocolate Curls, for decorating (optional)

Directions

  1. Preheat oven to 350 degrees. Line standard muffin tins with paper liners. Whisk together cocoa and hot water until smooth. In another bowl, whisk together flour, baking soda, baking powder, and salt.
  2. Melt butter with sugar in a saucepan over medium-low heat, stirring to combine. Remove from heat, and pour into a mixing bowl. With an electric mixer on medium-low speed, beat until mixture is cooled, 4 to 5 minutes. Add eggs, one at a time, beating until each is incorporated, scraping down sides of bowl as needed. Add vanilla, then cocoa mixture, and beat until combined. Reduce speed to low. Add flour mixture in two batches, alternating with the sour cream, and beating until just combined after each.
  3. Divide batter evenly among lined cups, filling each three- quarters full. Bake, rotating tins halfway through, until a cake tester inserted in centers comes out clean, about 20 minutes. Transfer tins to wire racks to cool 15 minutes; turn out cupcakes onto racks and let cool completely. Cupcakes can be stored overnight at room temperature, or frozen up to 2 months, in airtight containers.
  4. To finish, use a small offset spatula to spread cupcakes with frosting. Refrigerate up to 3 days in airtight containers; bring to room temperature and garnish with chocolate curls just before serving.

Friday, December 3, 2010

Recipe Fridays!


Chocolate Gingerbread Bars

Ingredients

Makes 16

4 tablespoons (1/2 stick) unsalted butter, melted, plus more for pan
1/4 cup unsweetened cocoa powder, plus more for pan
3/4 cup all-purpose flour (spooned and leveled)
1 teaspoon ground ginger
1 teaspoon pumpkin-pie spice
1/2 teaspoon baking soda
1/2 cup packed dark-brown sugar
1/4 cup unsulfured molasses
1 large egg
1/4 cup sour cream
1/2 cup semisweet chocolate chips
confectioners' sugar, for dusting (optional)

Directions

Preheat oven to 350 degrees. Butter an 8-inch square baking pan. Line bottom with a strip of parchment paper, leaving an overhang on two sides; butter paper. Dust paper and sides of pan with cocoa; set aside. In a medium bowl, whisk together cocoa, flour, ginger, pumpkin-pie spice, and baking soda; set aside.

In a large bowl, whisk together butter, brown sugar, molasses, egg, and sour cream until smooth. Add flour mixture; stir just until moistened (do not overmix). Stir in chocolate chips. Transfer batter to prepared pan; smooth top.

Bake until a toothpick inserted in center comes out clean, 30 to 35 minutes. Transfer to a wire rack; let cool completely. Using paper overhang, lift gingerbread from pan. Transfer to a cutting board, and cut into 16 squares. Before serving, dust bars with confectioners sugar, if desired. (To store, keep in an airtight container at room temperature, up to 3 days.)


Friday, November 19, 2010

Recipe Fridays!


Chocolate-Pumpkin Cheesecake Bars

I'm positive that I've posted this recipe before, but it is so delicious that I couldn't resist a repost. Sure, you could bring boring old pumpkin pie to Thanksgiving. Or, you could be the hero of the night. Your choice;)

Ingredients
Makes 16

FOR THE CRUST

20 chocolate wafer cookies, (half a 9-ounce package)
2 tablespoons sugar
4 tablespoons unsalted butter, melted

FOR THE FILLING

2 packages bar cream cheese, (8 ounces each)
1 cup sugar
1 cup canned solid-pack pumpkin puree
3 large eggs
3 tablespoons all-purpose flour
1 teaspoon pumpkin-pie spice
1/2 teaspoon salt
4 ounces semisweet chocolate, chopped

Directions

Preheat oven to 350 degrees. Line bottom and sides of an 8-inch square baking pan with parchment paper or aluminum foil, leaving an overhang on all sides. Set aside.

In a food processor, blend cookies with sugar until finely ground (you should have about 1 cup crumbs); add butter, and pulse until moistened.

Transfer crumb mixture to prepared pan, and press gently into bottom. Bake until fragrant and slightly firm, 12 to 15 minutes. Set aside to cool.

Place cream cheese in food processor; blend until smooth. Add sugar, pumpkin puree, eggs, flour, pumpkin-pie spice, and salt; process until combined. Set aside.

Place chocolate in a microwave-safe bowl; microwave in 30-second increments, stirring between each, until melted. Add 1 cup pumpkin mixture; stir to combine. Set aside.

Pour remaining pumpkin mixture into prepared pan. Drop dollops of chocolate mixture onto pumpkin mixture; swirl. Bake until cheesecake is set but jiggles slightly when gently shaken, 40 to 50 minutes.

Cool in pan. Cover; chill until firm, at least 2 hours (and up to 2 days). Using overhang, transfer cake to work surface. With a knife dipped in water, cut into 16 squares. Serve


Friday, November 5, 2010

Recipe Fridays!

Chocolate-Mint Cupcakes

Yum. Just yum. The coming of winter always makes me think of mint; its coolness and refreshging bite are like stepping into the snow after sitting by the fire. And, who can go wrong with chocolate?

Ingredients

Makes about 18

1 1/2 cups all-purpose flour
3/4 cup unsweetened Dutch-process cocoa powder
1 1/2 cups sugar
1 1/2 teaspoons baking soda
3/4 teaspoon baking powder
3/4 teaspoon salt
2 large eggs
3/4 cup buttermilk
3 tablespoons vegetable oil
3/4 cup warm water
1 teaspoon pure peppermint extract
Mint Buttercream
Chocolate-Mint Leaves, for garnish

Directions

Preheat oven to 350 degrees. Line standard muffin tins with paper liners. Whisk together flour, cocoa powder, sugar, baking soda, baking powder, and salt. Add eggs, buttermilk, oil, water, and peppermint extract, and beat with a mixer on low speed until smooth.

Divide batter among muffin cups, filling each 2/3 full. Bake, rotating tins halfway through, until a tester inserted in the center comes out clean, 20 to 25 minutes. Let cupcakes cool in tins on wire racks for 10 minutes. Transfer cupcakes to racks, and let cool. Undecorated cupcakes will keep, covered, for 1 day, or frozen for up to 2 months.

Spoon buttercream into a pastry bag fitted with a large, plain tip. Pipe small mounds on tops of cupcakes. Flatten mounds with an offset spatula, then top with chocolate-mint leaves.