Showing posts with label tutorial. Show all posts

Wednesday, February 16, 2011

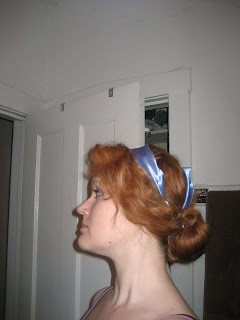
1940's Hair Tutorial


This video is very poorly framed, I know. I couldn't get a good angle for the camera! I promise I'll shoot this again and do a little better, so you can actually see what I'm doing (which is, after all, the point of a tutorial!). For now, learn what you can from this, and I promise to do better next time!


Monday, June 28, 2010

Brooch Bouquet DIY: Part 1


The day finally arrived to construct Tabitha's brooch bouquet! Yay! I've been fairly itching to do this project since we decided to go this route, rather than the traditional bridal bouquet, and i'm so excited to present the first part of the DIY for y'all;)


Materials

40-45 vintage brooches per bouquet
floral wire of around 18 gauge size, wrapped or unwrapped
a bouquest holder with floral foam inside
wire cutters
pliers for bending the wire
hot glue gun
patience!


We found all of our brooches on eBay by simply searching for vintage floral brooch lots. I knew my sister's wedding colors (purple and green) and so tried to find several in that range, but I mostly focused on shiny rhinestone bling-y brooches that would compliment each other. There are over 100 brooches in that picture and three bouquet holders; we made bouquets for Tabitha, myself, and A's "woman of honor".

Directions

1. Choose your brooches. If you get lots like we did, there will be some duds in there that you simply won't use. Separate out 40-45 of the best, and try grouping them by size or color. You want to think about this like floral arranging; the better mix you have of size, shape, and color, the more balanced and visually pleasing your bouquet will be.
2. Start wiring the brooches. There's no real science to this; every brooch is a little different, and some will be easier than others to deal with. If the brooch had a lot of petals I tried to weave the wire through them for stability; if it was flat on the back, I made a spiral with my wire and used hot glue to affix the wire to the brooch back. Important note: Tabitha wanted to keep the bouquet as a keepsake bridal bouquet, and didn't care about preserving the brooches to be worn later. If you want to disassemble this, skip the hot glue and only use brooches you can wire and unwire. Some of the heavy brooches got a doubled up stem, to make sure they would be steady, but most only needed a single thickness.


3. After you have four or five wired, start placing them in your bouquet. Remember to space out your big brooches and keep mixing colors around the bouquet, so that it never feels unbalanced anywhere. I kept spinning the bouquet holder as I worked to try to keep perspective on the arrangement. I also kept the stems pretty short, because I didn't want the bouquet to shake or shift much, and I wanted a cute little ball of bling for Tabitha. The longer your stems, the more brooches you need to fill the space! And, don't be afraid to reposition and stagger them a little, like in a real bouquet. Some of the brooches naturally fell to the back while others came forward, and I liked how they looked overlapping. It felt more organic. If you're finding that the floral foam is getting very holey and unstable, consider replacing it or going with a denser foam to start with. I found the floral foam worked okay for me, but everyone's experience might be different, and floral foam is pretty soft!


4. Once you have all your brooches wired and in place, hold your bouquet and turn it, trying to look at it from every angle. No doubt it will need some fluffing at this point; one side might seem higher than another, or one brooch might be sticking out too far or in too close. Fluff and preen until it's fairly balanced and you feel satisfied with the results.


The final result was quite lovely, and Tabitha loves it (yay!). My next tutorial will go over covering the plastic bouquet holder, utilizing fabric, hot glue, ribbon, and rhinestone decorations. For now, voila! I hope this inspires y'all to go out and make lovely and charming vintage brooch bouquets!

Wednesday, May 6, 2009

Late-Victorian Hair Tutorial


Happy Wednesday, and welcome to the fourth and final installment in my four-part series on Victorian Hairstyles. I have saved my favorite for last, of course: Late Victorian Evening Style.

The high Victorian period was all about excess: bustles were big, ruffles were everywhere, patterns warred on walls and couches and dresses. There was definitely a belief that more was better; if you've ever seen photographs of high Victorian interiors, they are crammed with ornate furniture, chotchkes, and everything that would stand still is decorated.

It should be no surprise then that Victorian women of this period felt the same way about their hair, especially when affecting formal, evening styles. This is the period where a woman might have three of four different hair pieces woven into her real hair (which was often more than 24" long itself). Pins, sticks, and flowers were added into loops and braids and curls, until a lady could conceivably have several pounds of hairstyle on her head. Not surprisingly, this period also saw a resurgence in interest in fashion of the Roccoco period, popularized by Marie Antoinette. There were pseudo-sacque-back morning gowns and fancy dress affectations of the beheaded queen popping up everywhere, and certainly the tiny hats perched in mounds of hair was reminiscent of the kinds of styles she made so popular and hundred years earlier.

This is not an easy style; this is pretty advanced. Be warned up front!

1. Yep; this is one of those styles you'll need a fall for. Unless you have ridiculously thick, long hair, you just can't get the look we're going for without at least a 3/4 wig. This is a wig that has two combs, at the center front and center back, to secure the piece in place but still reveal your own hair in the front. Mine is fairly long and has loose curls, which are invaluable when doing this period style. Remember that you can't curl a straight synthetic wig very easily if at all (keep that curling iron away unless you like the smell of burning plastic!), so start with a curly one, and you should be fine;)


2. As for your own hair, as you can see, I set mine on small to medium rollers overnight to make it pretty curly. It isn't really necessary for you to do anything to the back of your hair; you're only going to see the front. However, since I had to wear my own hair to work yesterday, I wisely decided to curl my whole head;) The curls should be fairly tight and rather small; if you have bangs, ladies, this is the time to flaunt them! Fringe, as the Victorians called it, was definitely in, with waves or tight curls in front being very popular. You almost never saw a lady without some kind of wave or curl in her hair, especially for evening.


3. Here comes the advanced part of today's tutorial.
To get the high curls and loops seen so often in period photographs, you will need:
-at least 10 large bobby pins
-at least 10 small (or regular) bobby pins
-some time
-a lot of patience
I've been dressing wigs and hairpieces for many years, and if there's one lesson I've learned, it's that a wig does not behave like your own hair. You must be gentle and take your time; never brush it forcefully or pull it too tightly. Remember that the tighter you try to pull a wig against it's natural grain (ie: up instead of down), the more it will fight you and show bald spots and stitching lines. Slow and steady wins the race here.
Start by taking some of the longest hair on one side of the wig and make a medium-sized braid, wrapping the braid around the front edge of the wig to hide the seam where it will join to your hair. Pin the braid in place and hide the bobby pins as best you can, securing them into the lace cap of the wig for the best stability wherever possible. Then, go to work on the rest. Working methodically and starting in the center front (which is best for acheiving a symmetrical style), take sections of hair and loop them into large curls, pinning them into place. You may have to unpin and redo sections when trying to find balance; that's okay! Remember, I said you needed patience for this one! Keep looping and pinning until you have secured most of the hair, concentrating the most height and volume at the top, and tapering it down. I have left several long trailing curls in the back, which is appropriate for a younger woman, but more mature ladies might want to pin all the hair up into a more controlled style.


4. Now, prepare your own hair for the wig. As the wig is now pretty top/front heavy, I have pinned a braid in place at the top of my head to provide it with a place to secure the comb into. The rest is pinned back; you can twist it into a french twist or a high, tight bun. Leave a few curls out in front; this is when to showcase your fringe, if you have it!


5. Finally, you're ready to put the wig on! Take your looped
and pinned monster off the styrofoam head and carefully place it on yours, sliding the comb securely into the braid in front, and pulling the bottom comb into place as close to the nape of your neck as you can get it. The wig may need some adjusting at this point; it will always look slightly different sitting on your head than it does on the mannequin (I don't know too many people with heads shaped just like those styrofoam dummies). Adjust, fluff, and spray everything into place, et voila! You're done! If you have jeweled combs or hair sticks, place them in your hair now, and break out that bustled ball gown; you're ready for the biggest event of the Season!


I hope you've enjoyed my Victorian Hair Tutorials. Remember: looking fabulous starts on the inside, but having fabulous hair definitely helps;) If you have any questions, please don't hesitate to comment here, or contact me through my website. Now, go forth and be fierce, Victorian-style!


Wednesday, April 29, 2009

Edwardian Hair Tutorial!

Welcome to part three of my four-part Victorian Hair Tutorial series. Today I'm cheating a little, as Edwardian era hair is not Victorian, but I wanted to cover a wider range of hair styles and it was this or Romantic-era hair (shudder!).

Today's tutorial is for a hairstyle that was popular around 1911-1914. Women became interested in styles that seemed exotic, and this was "Greek", or at least their approximation of it. Fashions were changing pretty radically from just ten years before; dresses were long and close to the legs, and the pigeon-breast was out. Hair became freer too; gone was the over-the-top Gibson bouffant. It was replaced with a softer style which would last pretty much up to the '20's (no; I am not planning to bob my hair for this blog. Not yours.).

1. As always, start with wavy or curly hair. In my case, I used a wave-barrel curling iron to acheive the cascading waves you see here, and regular curlers to give the ends some curl. Part your hair down the middle (or somewhere near it, as with my hair!). If your hair is shorter, you're in luck; some women were wearing their hair shorter in waves, the precursor to the Marcello-wave hairstyle, though less controlled. You can get away with short hair in this period, though most women were still wearing their hair fairly long.
2. Section your hair into two, a front section and a back. I used a headband which I threaded ribbon through, looped twice around and pinned in the back.


3. Take the front two sections and pin them back, loosely. Nothing about this style is tight or contained; everything is very soft. Take the back section of hair and put it in a low ponytail.


4. Now take the hair in the ponytail and divide it into two. experiment with looping it to make an interesting, loose bun, and pin the sections into place. If you have long hair, now is the time to have fun with it; make figure-eights, loosely braid it, get creative!

Now, break out your Titanic-era dress, and stroll with first class! A simpler style for a changing time; give it a try for your next Edwardian-themed event. Stay tuned for the final installment of my Hair Tutorial Series: Late Victorian Evening Style!

Monday, April 27, 2009

Corset Tutorial!

The original I based my corset on
Yes, it's true, after complaining up and down how much I hate making corsets, I had to go ahead and make one yesterday. Unfortunately, my old corset, which has served me well for six years, is simply too big now. I took the opportunity to make the corset I've wanted for quite awhile; the blue satin confection pictured above. I had to omit the spoon busk; you can get these from specialty stores like Farthingales, but they cost an arm and a leg! I decided to keep cost down by taking the busk and steels out of my old corset and reusing them, and constructing it out of fabric and trim I already had in the workshop.

This blue crepe-back satin was purchased three or four years ago, for the purpose of making a new corset. I've always wanted a blue one, but you can see how my aversion to making them put this off for so long! I had to wade through a mound of fabric to find this, but I was glad when I did. It is darker than the original, but I like the cornflower color a little bit better.

I decided to use the Laughing Moon Mercantile Undergarment Pattern; my previous corset was the Silverado, but I decided to try the Dore corset instead. Little did I know that in the ensuing six years, the uncut pattern pieces for the Dore had disappeared! Thus began my odyssey: the first drafted corset. I had only the two front pattern pieces for the Dore pattern, so I cut them out, and then looked at the pattern instructions. Using the picture of the other pieces as a guide of the basic shape, my knowledge of corsetry, and my original corset, I drew out the pattern on my twill:

I did make a few mistakes. In order to do a tighter waist-lacing, the hips need to be fuller than I have them here; unfortunately, I didn't realize this until the whole thing was constructed and on! However, for my first attempt, pulling the pattern basically out of my ass, I'm rather proud of myself;)

Next came those distinctive fold-over pleats that the historical one has. These were a major pain, and I should have omitted them, but what can you do? I cut my four front satin pieces extra long, keeping the twill interlining the correct shape, and then pinned the pleats and ironed them, turning the pleats down at the center front and up at the bust seam. I tried my best to match them so the pleats would meet, but something happened in construction to make them slightly askew. D'oh!


Once the pleats were all pinned, I proceeded to sew the satin and interlining pieces together, treating each matching satin and interlining pieces as one piece, flat-lining the top layer, basically. The lining was sewn together as well, and a piece of petersham was sewn on the wrong side of the lining to serve as the waistband. Then, I prepared my top layer to receive the busk.
There are lots of different techniques for this, and I'm sure different corset makers will have different methods, but I always mark out where the busk must come through the fabric and make button-holes for the hooks and knobs to poke through. Once they're complete, I sew the front and lining together at the center-front and center-back seams and turn the two sides of the corset right-side out. Then I insert the busk into each side and sew a pocket to hold it in place, as close to the busk as possible so it doesn't shift at all.


Next, I top-stitched a seam down each seam in the corset, sewing the lining and top-fabric together. Another seam goes next to these, to create the bone channels. Most Victorian corsets take 1/4" white and spiral bones, and the presser foot on your machine is a good guide for how wide the channels need to be. I sewed a seam at the bottom to close the channels off, and inserted my bones. The back two channels, placed on either side of the grommets, are white steel, and the rest are spiral, for flexibility. Once the bones are in place, I sewed the top seam to close them off.

Next, I cut bias strips of fabric and sewed them to the top and bottom of the corset, folding them over in the back and slip-stitching them into place, to give the corset a nice, finished look. I marked my grommets and set them at this time as well.


Finally, I sewed the trim and did the embroidery. In this case, I used two ecru cotton laces, layered over one another. The bottom lace had a definite edge, which I liked, but no space for threading ribbon into it, so I put a thinner threading-lace over it, and put a baby blue single-face satin ribbon through it for some color. At the bottom of the bone channels I embroidered a simple cross-over x, which you find so often in period corsets, to reinforce the ends of the bones. Then, I laced myself in and tightened, and discovered that the hips were a little narrow and the pleats had shifted! Oh, well. It was only 11 hours worth of work, after all. Next time, I'll know better!
My sister's first words? "Now I want a new corset . . . "
Yeah. Next year, Tab. Next year.

Wednesday, April 22, 2009

Civil War Hair Tutorial

Welcome to the second installment of my four-part series covering Victorian-era Hairstyles. Today's tutorial covers hair during the period of roughly 1860-1865, just the Civil War years. I'll be showing you a simple day look; evening hairstyles during this period could be freer and more elaborate, utilizing hair pieces and flowers and such, but day styles were by and large very simple and controlled. Again, as with the Gibson style from last week, if you have shorter hair, you may want to invest in a good hairpiece or fall, and if you have very short hair, a wig! Bad news for ladies with "fringe" (bangs): Civil War ladies didn't wear it! So get out the gel or smoothing balm and try to make it blend into the rest of your hair, and let's get started;)


1. Start with your hair down, and parted down the middle. Once again, it's good to have a little bit of wave in your hair, but it's not crucially important for this style; the rain yesterday made my hair completely flat, but I was still able to get a nice period style out of it;)


2. Section the front of your hair into two pieces, and pin up to keep them out of the way. You won't be using this hair right now, so don't worry about looking like an Anime heroine for a few minutes;)


3. Section your remaining hair into two, a back section and a middle section. Twist the back section into a bun and pin into place, comme ca.


4. French braid the two middle sections of hair, braiding under-over, rather than over-under. This is so that your hair gets the appearance of having two long braids just draped over your head, instead of the common appearance of french braids. Practice and experiment with this if you're not sure what I mean; it's difficult to explain here, but once you get it, you'll slap your forehead and go, "Oh! It's just a backwards french braid!" Once the two braids are done, put a bobby pin or small rubberband on the ends to hold them. No big bands; you don't want anything modern showing once the style is finished!


5. Now, you get to unpin the front sections! Huzzah! Take them down and then bring them to the back, loosely, so that they cover your ears and sweep smoothly over your head. This is when bangs can be annoying; hairspray, gel, whatever works, get those suckers to lay smoothly with the rest of your hair, hidden! Pin the sections in place, hiding the pins in the bun. If your hair is very long, you can wrap them around the bun and then pin in place.


6. Finally, take the braids and sweep them to the back as well, once again pinning them into place over the bun, trying to hide the pins as much as possible. You're finished!
There is another option for those ladies who don't want to take the trouble to braid and coil their hair, or have short hair and don't care to spend the money for a hair piece: the day cap! Most women during this period over the age of twenty-one or so covered their hair during the day in some kind of cap, which can be very convenient if you're all thumbs in the hair department;)


Now, go forth and have Victorian hair! I hope this answers some questions (and doesn't raise more!) Please feel free to contact me with questions and I'll do my best to answer them as well as possible. Stay tuned for part three in the four-part series, coming next week!

Wednesday, April 15, 2009

Gibson Girl Hair: A Tutorial


This is the first of a planned four-part series where I give tutorials on how to execute period hairstyles. I'm not going in chronological order, so the first one I'm covering is the iconic Gibson Girl style. Stay tuned for future tutorials on Civil War Era Hair, 1870's-1880's Styles, and Edwardian (Titanic Era) Hair.

To start with, the first thing you need to understand about Victorian and Edwardian hair is that a lot of the elaborate styles you see in fashion plates and illustrations are exaggerations of what women actually wore (the same goes for dresses!). The best source for real Victorian hair is CDV's (carte des visites) which show how real women of the period looked and dressed.

The second thing you need to understand is that while women in this time period usually kept their hair pretty long, they still routinely used falls and hair pieces to acheive the styles they wore, especially for formal occasions. Falls did not come into existence in the '60's; Victorians used them all the time! So, if your hair is short or fine, think about investing in a decent 3/4 wig or hairpiece to match your hair. If it's really short, get a good wig!

Now, on to the tutorial part:

For most period styles, I recommend starting with some wave or curl in your hair. Mine is stick-straight, so I set it on foam rollers the night before for tighter curls, or several nights before for soft waves like this. You want to start with slightly dirty hair too, because hair that is too clean tends to not hold style as well, and can be fly-away. My hair is naturally pretty thick, so I won't be using a rat or fall for this style, but I'll go over what to do if you need one in a moment.


1. Start with hair down and section hair at about the center of the scalp, horizontally from ear to ear, so you have a front curtain and a back section. Pull the back into a high ponytail and secure with a band, reserving for a bun later.


2. Next, section the front part once again, and begin to tease the middle section of hair; this is the support for the style. Don't be afraid to really tease like a maniac; the higher you can get your hair, the better and more dramatic the style will look when finished! Once teased, take your comb and very gently drag it just over the top of the teased hair, smoothing only the surface. Then, pin the ends under in the back, comme ca:


* If your hair is thin or fine, you probably won't be able to get much of a rat going! This is where making or buying a rat will help you out. To make a rat, take hair from a hair piece (or, do as the Victorians did, and save your own fallen hair in a hair receiver!) and tease into a ball, pinning in place in the same way I pinned my own hair. You'll want to choose hair the same color as yours, because it may not all be covered, and make sure to smooth just the surface of the rat as shown. Best part? You get to save it to use again and again, whereas I have to redo mine each time!


3. Next, take the last front sections of hair and separate into two parts, pinning one side up, and then the other, and securing over the pins you used to put the rat into place. Here's the fun extra-credit part: a lot of pictures of Gibson Girls show a little dippy bend in the hair that gave the top a swirled appearance. If you want to try for that, simply take the last section and roll it a bit as you pin it. Experiment with this for the best result!


4. Finally, take the ponytail you reserved and wrap it loosely into a bun, pinning into place. If you have any bone, horn, or celluloid combs, stick them in too!


5. Finally, if you have fine hair, now is the time to lacquer it with your very non-period hairspray! You're finished!

Stay tuned for the other tutorials, coming soon!