Showing posts with label bridal accessories. Show all posts

Monday, October 25, 2010

New Items in my Etsy Shop!


There are finally new items in my Etsy Shop! Yay!!! It's been a pretty busy summer and autumn, as I'm sure you can all tell, so it's taken me a while to get anything new up. But, I hope it's been worth the wait! The emphasis in most of these new pieces is winter, and most of the pieces are definitely bridal.


Thank you to Hairspray Revolution for doing the lovely dewy makeup and gorgeous hair for this shoot! You ladies are amazing, and it's nice to finally meet you in person!

What do you think of the new pieces, dear readers?

Monday, September 27, 2010

The Shoes . . .


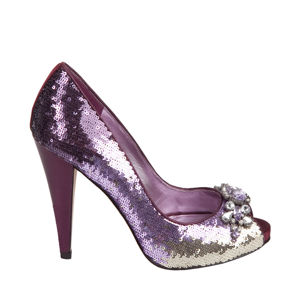
So, Tabitha and I went shopping this weekend for wedding shoes. This leaves most guys scratching their heads; indeed, A seemed mostly dumbfounded at the number of shoes she tried on, and awestruck at the price of each pair. He kept reminding us, pointedly, that he was paying for his entire wedding wardrobe what Tab was paying for her shoes. Wisely, we ignored him;) Men just can't understand how important it is for the bride to look and feel perfect on her wedding day; I knew she had to find the shoes she loved, and that once she did, we had to walk out with them.

A trip to Old Orchard mall yielded a lot of walking; we stopped in Lord and Taylor, Nordstrom, Steve Madden, Nine West, Aldo, and Macy's. I knew she would know the perfect shoes when she tried them on, and sure enough, the first store and the first pair were it. But, they didn't fit quite well enough, and so we kept looking. But, she kept wistfully mentioning them throughout the day: "If only that pair at Macy's had fit . . .", "I still like that first pair more . . .". After three hours, she was cranky and discoraged, and we went back to Macy's to eat and get her blood sugar back up. I suggested she try those first shoes again, and that we add a bit to the back to make them fit better. She brightened and we went back upstairs to try them on again.

Her face just lit up when she put them on. They are sparkly and glamourous, covered in sequins and jewels and exactly what wedding shoes should be. She didn't want to take them off. Wisely, she decided to also get a pair of flats for the reception, and while those shoes are adorable too, she did not elect to whip them out of the box as soon as we got home and try on the entire wedding kit just so she could see the whole ensemble. She wore the heels all night, in her pajamas.


Thank you Macy's for having the shoes, and thank you Nina for making them. Nina Erna shoes in Burgundy Prugna.

Tuesday, July 13, 2010

Brooch Bouquet DIY: Part 2


As promised, here's part 2 of the Brooch Bouquet DIY! I loved making these bouquets for my sister's wedding, and I'm tickled to share the directions with all of you;)


Supplies

-a circle of satin fabric with a rolled of serged hem
-a little square of the same fabric
-matching satin ribbon, 1 1/2"
-contrasting satin ribbon, 1/2"
-a pretty rhinestone button for an accent
-glue gun
-scissors


1. Start with the square of satin. I made it about a inch and a half square, just to cover the very end of the holder. Put a dot of glue in each corner and glue them to the holder bottom, making a little encased end.

2. Take your circle of fabric next. I made mine a little wider than the base of the holder, so it would come out a little over the brooches. Cut a hole in the center of the circle slightly larger than the stem on the holder, and put the stem through this. Then, start to pleat the fabric and glue it down to the base, going slowly and gluing each pleat down carefully so everything is held to the base and no plastic or foam is showing.

3. Next, take your ribbon and start to twine it around the stem. Glue the end first, and then glue at regular intervals to keep the ribbon very smooth and secure so there is no white plastic showing. My holder's stem was slightly irregular in shape, so this created wrinkles in the ribbon; that's okay! It actually gave it a less-perfect appearance, which was nice.

4. At the bottom, cut your ribbon and turn the end under, gluing it down so that every bit of white is covered in ribbon or fabric.


5. Finally, at the place where the stem meets the base, I took the contrasting ribbon and made a simple band, covering the seam with three tiny rhinestone buttons for a bit of bling. Remember that you'll be holding the stem pretty tightly on the day of your wedding, so you don't want anything sharp or uncomfortable where your hands will be!

Voila! Your brooch bouquet is ready for your big day! A few extra tips: as you can see from the pics, I turned the bouquet upside down to work on it; this was accomplished by covering it first with a cloth napkin and then holding the top as I flipped it onto my lap, so that none of the brooches went astray. It also protected my legs from any sharp bits from the brooches!

I hope this is helpful to those of you thinking of doing this project for your own wedding; it's time-consuming, but totally worth it! Happy DIY-fun, everybody!

Monday, June 28, 2010

Brooch Bouquet DIY: Part 1


The day finally arrived to construct Tabitha's brooch bouquet! Yay! I've been fairly itching to do this project since we decided to go this route, rather than the traditional bridal bouquet, and i'm so excited to present the first part of the DIY for y'all;)


Materials

40-45 vintage brooches per bouquet
floral wire of around 18 gauge size, wrapped or unwrapped
a bouquest holder with floral foam inside
wire cutters
pliers for bending the wire
hot glue gun
patience!


We found all of our brooches on eBay by simply searching for vintage floral brooch lots. I knew my sister's wedding colors (purple and green) and so tried to find several in that range, but I mostly focused on shiny rhinestone bling-y brooches that would compliment each other. There are over 100 brooches in that picture and three bouquet holders; we made bouquets for Tabitha, myself, and A's "woman of honor".

Directions

1. Choose your brooches. If you get lots like we did, there will be some duds in there that you simply won't use. Separate out 40-45 of the best, and try grouping them by size or color. You want to think about this like floral arranging; the better mix you have of size, shape, and color, the more balanced and visually pleasing your bouquet will be.
2. Start wiring the brooches. There's no real science to this; every brooch is a little different, and some will be easier than others to deal with. If the brooch had a lot of petals I tried to weave the wire through them for stability; if it was flat on the back, I made a spiral with my wire and used hot glue to affix the wire to the brooch back. Important note: Tabitha wanted to keep the bouquet as a keepsake bridal bouquet, and didn't care about preserving the brooches to be worn later. If you want to disassemble this, skip the hot glue and only use brooches you can wire and unwire. Some of the heavy brooches got a doubled up stem, to make sure they would be steady, but most only needed a single thickness.


3. After you have four or five wired, start placing them in your bouquet. Remember to space out your big brooches and keep mixing colors around the bouquet, so that it never feels unbalanced anywhere. I kept spinning the bouquet holder as I worked to try to keep perspective on the arrangement. I also kept the stems pretty short, because I didn't want the bouquet to shake or shift much, and I wanted a cute little ball of bling for Tabitha. The longer your stems, the more brooches you need to fill the space! And, don't be afraid to reposition and stagger them a little, like in a real bouquet. Some of the brooches naturally fell to the back while others came forward, and I liked how they looked overlapping. It felt more organic. If you're finding that the floral foam is getting very holey and unstable, consider replacing it or going with a denser foam to start with. I found the floral foam worked okay for me, but everyone's experience might be different, and floral foam is pretty soft!


4. Once you have all your brooches wired and in place, hold your bouquet and turn it, trying to look at it from every angle. No doubt it will need some fluffing at this point; one side might seem higher than another, or one brooch might be sticking out too far or in too close. Fluff and preen until it's fairly balanced and you feel satisfied with the results.


The final result was quite lovely, and Tabitha loves it (yay!). My next tutorial will go over covering the plastic bouquet holder, utilizing fabric, hot glue, ribbon, and rhinestone decorations. For now, voila! I hope this inspires y'all to go out and make lovely and charming vintage brooch bouquets!

Thursday, April 1, 2010

Newsy News!


My dears, I am so excited to announce the newsy news this morning: Seamstress of Avalon Bridal is now carried at Silver Moon Vintage in Chicago, and in a few days will be on their website! Thank you to the lovely ladies of Silver Moon in Wicker Park, and I look forward to working with them in the months to come. They have a wonderful selection of beautiful vintage gowns, hats, jewelry, and other fab accessories from the turn of the last century through the '80's and up to custom made vintage-styled dresses for the bride and bridal party, and I'm ecstatic to be a part of their collection. Here's a sampling of the Seamstress of Avalon pieces you can find exclusively at Silver Moon:


Head on over to 1721 W. North Ave if you're in the Chicago area, or go to their website; my pieces should be up soon!

Tuesday, March 16, 2010

Favorite Site Tuesdays: DK Designs


This week's favorite site is pretty amazing. The pictures appear to be of beautiful flower arrangements, but you're only half-right; the flowers are made of clay! DK Designs of Hawaii has been featured on Martha Stewart, has a wonderful Etsy store and has recently partnered with Estilo Weddings. The child of artist Diane Philips, DK Designs was started in California, relocated to Oahu, and now is back in Cali (can you say "roadtrip" next year?) The flowers are absolutely amazing, and I am in awe of how realistic they look. A fabulous, eco-friendly alternative to traditional bouquets and centerpieces.


Stop by DK Designs today; their prices are extremely affordable for flowers this lovely. Imagine having a bouquet that would never fade, and could be passed down to your daughters?

What do you think, dear readers? Do you like the idea of everlasting bouquets and centerpieces in clay?

Monday, March 15, 2010

New Items in my Etsy Shop!


I'm so excited to put up my new pieces today! Please stop by Seamstress of Avalon and check them out; it was a very busy weekend, very productive, and pretty darn fabulous! Thank you to my models, as always, and look for new developments coming soon . . .


What do you think, dear readers? Like the new items in my shop?

Thursday, February 18, 2010

Aaannnddd . . . . Ta-dah!!!!


I got the last piece for Tabitha's bridal headpiece yesterday, and decided to just jump in and make it! I was careful at each step to let her know what I was doing, so she could tell me if she liked or disliked something; the last thing I wated was to get it done and have her unhappy with the results! But, I think you can tell from the picture above that she likes it!

I started with a Fosshape base which I curled over my knee and covered in white 100% silk duchesse satin with a white felt backing. Then, I hand-curled three white peacock spears--not bleached feathers, mind you! It pays to know the difference: white peacock feathers are naturally white, as they come from a white peacock. Bleached peacock feathers tend to look dirty beige; not at all what I wanted here! Thank you Susan from Peacocks Forever for your fabulous feathers and even better customer service!


To the curled feathers I added vintage velvet millinery baby's breath from Japan, and one white peacock sword feather. I stitched gathered white birdcage veiling to the base and then sewed on a vintage Art Deco dress clip, the same era and style as a beautiful brooch we just found for Tabitha's dress. Lastly, a metal comb was attached to the back, and Ta-dah!!! I'm so glad she likes it! Now, we just need to get a nice hatbox for it, and stash it away for the next 9 months . . . .

Oh, and A's reaction when he saw it? I quote: "It's very white." Men.

What do you think, dear readers?

Tuesday, February 9, 2010

Favorite Site Tuesdays: Romancing the Bling


Oh my goodness. This week's featured shop is just too fabulous. Romancing the Bling is just what it says; a huge collection of bridal hair combs and clips fashioned from repurposed vintage rhinestone brooches. These are not rinky-dink 1960's brooches either; these are full-on, art deco, shiny, beautiful pieces, perfect for the vintage-styled bride (or even the occasional red carpet!).


Gorgeous. If I could get away with it (and my bank account didn't scream in protest), I would buy several of these pieces.


I have just started buying brooches for Tabitha's brooch bouquet (and mine!), and I'm still in the process of gathering materials for her bridal headpiece. If this didn't break the bank, I'd consider adding one of these to the mix. Simply stunning. Check out Romancing the Bling; click, drool, and buy;)